A picture says more than a thousand words
Now Orkut allows Images and html code on Scrap, many friends asking me to give nice website for collection of animation, images, etc..
So I decided to suggest some animation sites service providers, try the links below
Image Generators: imageGenerator.net provides you with an easy way to add text to various images, allowing you to create a funny picture, or to illustrate a joke. You can save these pictures online and send them to your friends, or show them on your favorite message board or website.
Animation Factory: 500,000 Animations, Animated Clip art, Motion Designs for Video, PowerPoint, Flash, Websites, E-mail and more!. Use our unique animations, Flash designs, video elements, PowerPoint templates, sounds, music, and backgrounds to bring your projects to life! Become a member of Animation Factory and immediately start downloading from our huge library. Hundreds of new items added every week.
Best Animations: Best Animations is a collection of free animated gifs found on the web. Except where indicated with an asterisk all animated gifs are believed to be free to use. If an asterisk appears next to an animation then you must check the copyright restrictions posted on the site linked at the bottom of the page where the animation appears. Please notify the webmaster if you see a copyrighted animation that is not credited.
Animation Library: the NEW Animation Library, a site featuring over 13,748 free animations for you to use on your website or send as digital postcards using our powerful Postcard Station. While you are browsing the Animation Library, you can listen to great music by using the Jukebox. To navigate our site, just use the Links in the menu below and on the sidebar to select animation you want to see. Enjoy your visit!
Gif animations: This is the Internet's original and largest collection of free animated GIFs. Right here, you have access to more than 20,000 animations, clipart and backgrounds. Price tags are not included and no registration is ever necessary. You can put this site on your browser's Favorites menu right now. Just press CTRL + D (works for most browsers). Then come back often to check out the new images that have been added.
Free animations: All the animations are free to download and use on your websites, emails and desktops. Many of the free animations and graphics have been created by the Webmaster, so you know you are getting original images. The 3D Words and messages are especially interesting. These have been created by the Webmaster using several types of software as listed in the disclaimer.
Animation Gold: large collection of free animation and clipart that you can download for free. Our archive of animation and clipart includes lots of new animated gifs and clipart you've probably never seen before. We will continue to make new animation and add it to our site. Click the free animation link at the left and it will take you to our animation page where you will find the animation menu listed by category.
Animation Central: Welcome to animation central where we serve up hundreds of free animations on the best free animated gif archive on the net today.
fg-a.com: Everything Needed To Build Or Enhance Your Web Site.
Browse for Animated Gifs, Clipart, Animations, Backgrounds and more
Animation station: best animations, backgrounds, graphics on net
Zwani: No Popups... No Spyware... No Spam! Just 1000's of Comments & Graphics To Use Everyday! Zwani.com is THE place to get all of the comments and graphics you could ever need for use on Myspace, friendster, Hi5, Myeeos, your website, friends blog or any other place you want to add a little comment or graphic. From comments and quotes to backgrounds, page codes and glitter graphics we have it all!
Pimp Hi5: this site provides Hi5 comments, glitters, animation, graphics, layouts, backgrounds, icons, falling hearts and many one
and you can find more website on Google search. Just click hear
Clear your tracks on PC
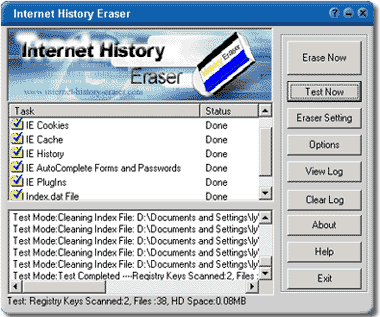 Did You Know......
Your computer is tracking all your actions and stores the evidence into your hard disk. Anyone else can see where you have been on Internet and the images, movies you have seen, even everything you did on your computer would leave traces on your computer, Perhaps you stumbled onto one or two adult Web sites. Perhaps by accident. Perhaps on purpose. And you don't want your husband/wife, dad/mom, boss/colleague or anyone else to know you've been there.
You can clear your history or empty your cache file in your browser's settings, but it will not protect you, some files can not be Erase.
Now its simple Single Click Complete Erasing! With only one click, Internet
History Eraser can clean up every trace of your Internet activity! Just
Choose what you want to erase, then click the Erase, and Internet History
Eraser will automatically remove all traces of your internet history!
[ Download trial ]
[ Crack ]{provided by Ben}
Basics of telnet
Learning Telnet
::Don't use this for illegal stuff::
Introduction:
Telnet is used to connect to remote machines through emulation. This means that
it can connect to a server, any server instantly because of it's ability to emulate (copy)
remote computers.
Lets Start:
In Windows, Telnet can be found by going to Start -> Run and then typing telnet.
The application should then pop up. If you don't have Windows, there are many Telnet alternatives for mac, linux etc. Since I don't know any,search the internet for Telnet for Linux or Telnet for Mac and you should find something instantly.
If you have a PC and are using Windows 98/95, 2000, Me, or XP continue...
As you can see, Telnet has 4 menu options. These are Connect, Edit, Terminal, and Help.
If you click Connect, you should see more options. Here they are.
Connect:
Remote System..
Disconnect
Exit
Names of servers you have been on.
To connect to a server, click Remote System...
This will then take you to a dialog box that has these fields:
Hostname:
Port:
TermType:
There should also be a Connect button and a Cancel Button.
Lets go over these & what you should put in them.
-Hostname-
The Hostname can be the address of the website your going to be connecting to:
http://www.google.com
or it can be the IP address. Keep in mind that you can only connect to servers and not to clients (other PCs)
an IP Address looks like this: 64.233.167.99
-Port-
Port can bb either the port number you wanna connect to on the server (Port 80 is the Internet, Port 23 is Simple Mail Protocol then there are some more ports for different things..)
or you can keep it Telnet and see what happens.
-TermType-
TermType is the type of Terminal telnet will be acting like.
This doesn't matter most of the time, so you can keep it to default or try other ones if you want.
When you have all this set up, you can Click Connect & see what happens.
Note: Sometimes many servers don't like anon people just logging on, so be careful when logging onto servers, because sometimes it might be some big company that likes bullying people or just SOMEONE who likes bullying people and then they might want to find you or trace you or something and I know for a fact you don't need that happening.
Another Note: When you go to a server and type something, such as a login name or a password, you might not see anything even though you are typing. this is a feature that telnet or the other server uses. It's for some kind of safety measure.
Ok that's all for the Connect Menu, lets go over the Terminal menu.
The terminal menu should have 3 options:
Prefernces
Start Logging
Stop Logging.
-Prefernces-
If you go to this, a dialog box will come up with various options. Here, you can change the
text color & background color of the program, and you can enable Local Echo, which shows
you everything you've typed, Blinking cursor if you want the cursor to blink check it, if not un check, Block cursor if you want the cursor to be shown as a block, VT100 Arrows, don't worry about these they are useless, Buffer Size, this allows you to set the number of lines of text you want to be shown before the screen starts to scroll, The Terminal emulation type, always have this set on the default unless you know what the second one is and you know what your doing.
-Start Logging-
This logs everything you do on Telnet in a log file on your computer.
-Stop Logging-
This will stop logging processes.
Well that's it for basics of telnet. Thanks for reading.
URL Redirections
Many Site provides URL redirection for free of cost, some site will force for adds and some provide without any addsThis are some sites provide Url redirection with site stats for free but we must be registered to use it
http://www.dot.tk/
http://www.c-o.in/
http://c0m.in/domain/webhosting.html
The free web sites below can take a long URL and give you back a shorter URL without requiring registration. Since these sites forward a click from one link to another, they are also known as URL forwarders and some do sub domain forwarding. Any of these services will do a decent job
http://www.metamark.net/
http://notlong.com/
http://www.snipurl.com/
http://tinyurl.com/
http://minilien.com
http://tinylink.com
http://qurl.net
http://urlcut.com
http://link.toolbot.com
http://6url.com, doiop.com
http://tighturl.com
http://paulding.net
http://yep.it
http://elfurl.com
http://shortlinks.co.uk
http://shurl.net
http://urlx.org
http://301url.com
http://ataja.es
http://flingk.com
http://simurl.com
http://myurl.in
http://memurl.com
http://urlcutter.com
http://hyperurl.com
http://urltea.com
http://surl.se
http://dn.vc
http://redirx.com
http://easyurl.net
http://shorterlink.com
http://cropurl.eu
http://linkslice.com
http://dwarfurl.com
http://shrinkurl.us
http://ix.lt
http://curio.us
If you known other website not listed in above list leave those website in comments
Rapidshare Downloader
CMS Grabber is the best tool I ever found on internet, this tool made me stun when I started using this, many rapid share users are still searching for free premium account, this tool make it useless. Using this tool we can download files from rapid share without any download limitations, multiple files at once, this is more than rapid share premium account. Lets see it in brief

THE ONLY LEGAL PROGRAM FOR DOWNLOADS FROM RAPIDSHARE !!!
Bypasses download limitations. Download multiple files at once. Download even more than with premium !
This release is sponsored by StackFile Corp.
What's new
- fixed rapidshare.com grabber
- fixed rapidshare.com link checker
- added huawei tool for renewing IP address for ADSL users(Supported hardware: SmartAX MT882 ADSL Router/Modem) - currently we support only USB mode, next version will alow to specify router address (it is now set to 192.168.1.2 -- you can configure your router to that address anyway so it will work in "Network Mode" -- i.e. when connected to the LAN NIC))
This release is sponsored by StackFile Corp and coded by SpongeBob.
NOTE: This program is not Vista compatible, but works fine with disabled UAC (User Account Control - very useful and inovative thing which renders your computer useless and annoying to use it).
Download from here
Homepage: CMSzone
The Home of grabber
Pidigin An Poweful Universal MessangeR
Amazing Solution for Universal messengerPidgin is a multi-protocol Instant Messaging client that allows you to use all of your IM accounts at once.
Pidgin can work with:
AIM, Bonjour, Gadu-Gadu, Google Talk,Groupwise, ICQ, IRC, MSN, QQ, SILC, SIMPLE, Sametime, XMPP, Yahoo!, Zephyr
So now you can able to have touch all the friends in different messenger in sametime without any problem
Beside this you can also get access to plenty of free plug-ins, including ones that can store a history of your commutation, store notes about friends, and other handy functions.
Download links:
Download from here or from official Pidigin site
Offline Browser
MetaProducts Offline Explorer is a Windows 95/98/ME/NT/2000/XP/2003/Vista offline browser that allows you to download an unlimited number of your favorite Web and FTP sites for later offline viewing, editing or browsing.
(HTTPS, RTSP, PNM and MMS downloads are supported in Offline Explorer Pro version.)
Offline Explorer also has many web development features that allow you to easily edit, view, browse or search downloaded Web pages (Offline Explorer has a built-in internal browser.) One of its strengths is to allow you to select (include or exclude) individual servers, directories and files using keywords.
Offline Explorer is known for its excellent user interface and for being one of the fastest known Web site downloaders available on the market today. Support of industry-standard technologies such as FTP, different proxy servers, Java and VB scripts, Java classes, Cascading Style Sheets (CSS,) Macromedia Flash, XML/XSL/DTD,Table Of Contents (TOC,) Acrobat (PDF,) M3U, AAM files, RealMedia (.SMIL, .RAM, .RPM,) MS NetShow Channel (.NSC,) VRML (.WRL, .WRZ,) QuickTime movies (.MOV) and cookies plus a built-in HTTP server that allows you to share downloaded files over an Intranet, make Offline Explorer the leader in offline browsing. The export feature allows you to copy downloaded sites to another location in different formats. Among its many awards, Offline Explorer is a ZDNet 5-star winner.
The most significant new features:
* Background colors in the Log Window
* Multiple proxy servers support
* The ability to change Project icon
* Site Map preview
* The ability to publish Projects on MetaProducts site
* Better downloading and parsing speed
Download links (provided by MirrorsWarez)
[Download software from here]
[Download Keygen from here]
Introducing Snap Shots Add-On for FireFox.
Snap Shots Add-On for Firefox brings the usefulness of the enhanced Snap Shots to ALL websites, not just the ones that have our code.
We've profiled a large group of the most popular sites that you use every day, including Google, Yahoo!, MySpace, Amazon, Wikipedia, etc., so that ALL shots work on these sites. Here are Snap Shots on Yahoo!:

For sites that aren't on our profile list (and we're adding new ones all the time), you can still get our enhanced shots:
* So, when you mouse over a video link on any site, you get an inline video.
* And when you want to check out a MySpace profile link from any site, you'll see who they are and what they look like.
* Scroll through a blogroll on any blog and you get RSS Shots of each of the RSS-enabled blogs.
* However, links to standard web content generally will not receive Snap Shots.
Currently, Snap Shots Add-On is only available for Firefox (Mac and Windows). We are working on an Internet Explorer version which will be released soon.
To download Snap Shots Add-On and take Snap Shots with you wherever you surf, please click here. And if you like Snap Shots Add-On, please be sure to Digg it!
Download Snapshots Firefox addon here
ENABLE RITE CLICK IN WEBSITES
Lots of web sites have disabled the right click function of the mouse button... it's really, really annoying. This is done so that you don't steal (via right-click->save picture) their photos or images or any other goodies. Unfortunately, it disables ALL right-click functionality: copy, paste, open in new window.It's easy to change, assuming your using IE 6:
Click "Tools"->"Internet Options"
Click the "Security" tab
Click "Custom Level"
Scroll down to the "Scripting" section
Set "Active Scripting" to "disable"
Click "Ok" a couple of times.
You'll probably want to turn this back to "enable" when your done... 'cause generally the javascript enhances a website.
Website Extractor ( Makes complete website available offline)
![]()
FEATURES
# Website Extractor is one of the fastest known website downloaders available today.
# Website Extractor gives you complete control over including and excluding downloads from individual servers, folders, URLs, and files using keywords.
# Website Extractor can download many websites simultaneously.
Transfer whole websites to CD-ROM or floppy
Another big benefit of the program is it changes html-links to relative names. In other words, it turns web addresses (URLs) into addresses that work on your computer. This means you can easily move whole websites or information to CD-ROM, floppy disk, or to another hard drive.
If you run a business, you could use this feature to put your website on to a CD-ROM or floppy disk and hand it out as an electronic brochure (saves money in postage rates). Researchers, writers, and journalists can easily archive reference material from the Internet.
Website eXtractor is designed to download websites exactly the way you want them. You can include the parts you need or exclude the parts you don't need (from directory, domain, and file names; to types of files, their size, or any other properties).
The program can download up to 100 files at a time, which saves you a huge amount of time compared to ordinary browsers. All data retrieved is stored in the directory you select and contains only the files and directories matching your filter instructions.
Website eXtractor automatically lets you download any files that were not copied due to transfer errors or bad connections. The program is equipped to run through a proxy server and download only revised or new files, bypassing documents that have already been copied - again saving your time and money (especially if you're using a dial-up connection).
Search robot
Website eXtractor is essentially an intelligent search robot that navigates the hyperlinks of cyberspace and downloads the websites and pages you want to store on your hard drive. With Website eXtractor, you can:
# Limit your search by domain types (.com, .net, .uk, etc.) by using the sophisticated filtering options based on a list of key words and other options.
# Scan websites both online and offline (on your own hard drive) using the built-in browser.
# Change html-links to relative names, allowing you to easily move information to CD-ROM, floppy disk, or to another hard drive.
# Select the documents you download by type and name using the superb filtering features.
# Set download depth for websites (you can choose to download only the first few pages of a site and weed out the material you don't need).
Website eXtractor is easy to use and can be configured to your individual needs. The program's user interface was engineered and designed after extensive consultation with user groups and by assessing their likes and dislikes.
Let's sum up what features make Website eXtractor a top-of-the line, "can't do without" browsing tool:
# Ability to download a large number of websites to your PC, which means you don't have to click your mouse a hundred times or more when you want to save files in a folder or directory. (You can go and get a coffee and when you return all the files you need with be neatly downloaded into the folder of your choice - ready to view offline).
# Conveniently browse graphic-heavy websites that take an eternity to load (no more frustration).
# Great for viewing websites with photo albums or galleries. Even high-speed connections take a long time to download graphics. And, the truth is, viewing such sites is far easier when done offline.
# Create databases from downloaded websites using the DB Maker program.
# Make an exact copy of your own business or personal website and transfer it to the server of another provider - very handy feature for webmasters.
Trial Version
Click here to download a trial version of WebSite eXtractor now. See how powerful it is for yourself. You get 30-days FREE trial and can download a maximum of 10,000 files in a single session using the trial version.
* Download
Buy Now
Or click here to register Website eXtractor today. The registration fee is just $29.95 USD. You will be able to download the registered version immediately after ordering.
LookItUp2 : Quickly look something up in wikipedia
LookItUp2
Quickly look something up in wikipedia, a dictionary or whatever you like (its easy to add custom sites!). The result is displayed directly on the page.
Whats different from v1.4 ?
There is now a search field incorporated in the result box. There is also tabs, so you can go directly to another search engine. There have been a major cleanup, and a lot of features in 1.4 has been removed (I figured these features obsolete, now that we have the tabs). Also, you should know that you can open the searchbox by clicking SHIFT+CTRL+SPACE
In order to get beautiful search results on the build-in sites, you should also install the LookItUp2 userstyle (This requires the Stylish plugin).

Note: Don't forget to disable the v1.4 script (if you have it installed)
Quick Tour
1. Install the script.
2. Try it out, by clicking SHIFT+CTRL+SPACE
3. The search box will open
4. Enter some text in the search field (Tip: If you select some text before clicking SHIFT+CTRL+SPACE, then the search field will be display this text).
5. Click on the "w" button (also called tab), in order to look it up in Wikipedia
6. Click the ">" button to look it up in the next tab (Which is Wictionary)
7. As default, the system preloads the next tab, so the Wictionary search result should display quickly. Now, while you read the Wictionary results, the next tab (Chambers) is preloading in the background.
8. Click on the page, or press Esc key to close the box
9. Select some text, and press "w".
10. Wikipedia will open in the right side of the page. All sites have shortcuts, so you can go quickly to a specific search engine.
11. While the text is still highlighted, press "i", and a google image search will show up
12. Customize the script by pressing '#' while some text is hightlighted. You can disable the preload feature by changing "cache ahead" to "0", and clicking "Save". I recommend keeping the value low. I think "1" is the best setting, but "2" may be good for you.
Its easy to add sites. Make a search for on your favourite search engine. Copy the url, but replace your word with the string: [words]. You can read more about adding sites on the v1.4 page
Note: Its possible to add cleanup instructions in the url, in order to get beautiful search results (css, xpath selecting, regexp and more). Its all documented on the CleanItUp page (note: use "lookitup" in the url instead of "cleanitup")
Note: This version is still kind of beta. There is probably a bug or two. Please let me know if you see one.
Note: This script does not work in IE7Pro. Fortunately, someone has made a version of LookItUp that works in IE7Pro. Its available here
Install this script
Requirements: Firefox 1.5v or above with Greesmonkey enabled
A complete Guide: Bypass Blocked Pages At School/Work
Use this proxies ti bypass website blocking
http://images.orkut.com
http://images3.orkut.com
http://backfox.com
http://atunnel.com
http://calculatepie.com
http://bravebadger.com
http://kproxy.com
http://www.stupidcensorship.com
http://www.vmathpie.com
http://www.ipfaker.com
http://proxify.com/
http://www.workfriendly.net/
HTTP://HOSTPH.COM
http://fontx.com/friendster
http://www.freeproxy.ca/
http://anonymouse.org/
http://www.shadowbrowser.com
http://www.hidemyass.com/
http://www.proxy7.com/
http://www.78y.net/
http://75i.net/
http://www.dzzt.com/
http://silya.com
http://995rt.com
http://pinoyarticles.com
http://bypass.thezerogroup.com
http://myspaceproxy.uni.cc
http://proxy.4lx.com
http://myspaceproxy.propunk.com
www.openawindow.net
http://aslproxy.com
http://newmyspaceproxy.com
http://myspace.aslproxy.com
http://boracaypics.com/server/
http://ydomains.be
http://bagsforsale.info/safe/
http://1prox.com
http://0prox.info
http://cgiproxynet.info
http://faxy.info
www.ilistblogs.com
www.12345666.com
HTTP://1PROX.INFO
HTTP://2PROX.INFO
HTTP://3PROX.INFO
HTTP://4PROX.INFO
HTTP://5PROX.INFO
HTTP://6PROX.INFO
HTTP://43PROXY.INFO
HTTP://0PROXY.INFO
http://nphproxy.info
http://online-telephone.com/voip/
http://myspace-bebo-proxy.uni.cc
http://beboproxy.uni.cc
http://anoproxy.info
http://alxy.info
http://airproxy.info
http://aimproxy.info
http://aquaproxy.info
http://afreeproxy.info
http://anonimousproxy.info
http://anonymusproxy.info
www.pinnacleproxy.com
http://1hide.com
http://bebobypass.info
http://bessproxy.info
In many places like office, college, browsing centers....
some of the websites have been blocked
simply by using this websites u can able to browse them without any problem
this list will be updated if u came to known more websites
if u known some other websites like this plz leve it on comments
E-mail Boomer
NET SEND FAKER: Download Type: Email Bomber

IP Changer: Download*

| Cgi Bug Scanner: Download* | |
 |
| PRO Port: Download* | |
 |
| Watcher: Download* | |
 |
We do copy various data by ctrl+c for pasting elsewhere. This copied data is stored in clipboard and is accessible from the net by a combination of Javascripts and ASP.
Just try this:
1) Copy any text by 'ctrl+c'
2) Click the Link: http://www.sourcecodesworld.com/special
You will see the text you copied on the Screen which was accessed by this web page. (Check it out !!)
Do not keep sensitive data (like passwords, reditcard numbers, PIN etc.) in the clipboard while surfing the web. It is extremely easy to extract the text stored in the clipboard to steal your sensitive information.
Be cautious ...
To avoid Clipboard Hack Problem, do the following:
1) In Internet Explorer, Go to Tools -> Internet options -> Security
2) Press Custom level.
3) In the security settings, select disable under Allow paste operations via script and click on 'OK. (Now the contents of your clipboard are safe.)
WAP on webserver
It could be a useful exercise for you to create your own WML program and test it on a live Web server. This requires the following two items:
1. Access to a Web server (IIS or Apache both work well)
2. A development tool to test the programming
For the development tool, we recommend that you download and use the latest version of Openwave's SDK, which is freely available to developers at http://www.openwave.com. Once you install this program, you simply need to specify where the files will be stored.
To tune the Web server, you must add the MIME (Multipurpose Internet Mail Extensions) settings. MIME enables your Web server to handle specific file types. If the file extension is not listed, the Web server will reject any requests for a file of that type.
IIS Setup
1. Click Start -> Settings -> Control Panel -> Administrative Tools -> Internet Information Service.
2. Right-click on the Web Sites directory and select Properties.
3. Click the HTTP Headers tab.
4. Click the File Types button.
5. Click the New Type button.
6. Enter wml (or wmls ) in the Associated Extension box.
7. Enter text/vnd.wap.wml (or text/vnd.wap.wmlscript ) in the Content Type (MIME) box
8. Click OK -> OK -> OK.
9. Restart IIS.
Apache Setup
1. Click Start -> Find -> Files or Folder and search the C:\ drive for mime.types
2. This file will typically be located under the C:\Program Files\Apache Group\Apache\conf directory.
3. Open the file and find the following lines:
application/vnd.wap.wbxml wbxml
application/vnd.wap.wmlc wmlc
application/vnd.wap.wmlscriptc wmlsc
application/vnd.wap.wbxml wbxml
4. After the application/vnd.wap.wmlc wmlc line insert the following lines:
application/vnd.wap.wml wml
application/vnd.wap.wmlscript wmls
5. You could also edit the existing wmlc and wmlscriptc lines and remove the trailing c.
6. Restart Apache.
As you can see, it is not difficult to get WML running on a Web server. There is no software or hardware to install. The fun and challenging part for you will be creating the WML pages and testing the Web server with either a real PCS or a virtual PCS device
HOW TO BLOCK A PARTICULAR WEBSITE IN PC
HOW TO BLOCK A PARTICULAR WEBSITE IN PCStep 1:
Go to
C:\WINDOWS\system32\drivers\etc
Step 2:
Open a “host” file in notepad. At the bottom of the line, you can see as follows
127.0.0.1 localhost
Add the following line at the end
Ex: 127.0.0.1 www.abcxyz.com localhost
The above code is written to block www.abcxyz.com website on my pc.
Edit Any Website You Want
This is a java script which allows u to edit any website........ change every text in the website.... but not save it!!!!!1. Go to any website
2. Paste the below code in the address bar of your browser
3. You can edit the website , but you cannot save it.
CODE:
javascript:document.body.contentEditable='true'; document.designMode='on'; void 0
Internet Explorer 7 Pro
If you are one of those die hard Internet Explorer 7 fan who refuse adjust with any other browser, then you should check out IE7Pro addon for Internet Explorer 7. It adds many features which are otherwise available only as Firefox Extensions:
* Enhance Internet Explorer’s Tabbed Browsing Capabilities
* AD Blocker
* Super Drag and Drop
* Mouse Gesture
* Crash Recovery
* Save Page to Image
* Quick Proxy Switcher
* Greasemonkey alike User Script
After reading about this addon at Download Squad, I was tempted to download Internet Explorer 7 and try this out. It tried few User Scripts which came along IE7Pro. You can also perform quick search by typing search keyword followed by the search query in the address bar, this is nothing new for Firefox or Opera users, but Microsoft never really bothered to add this feature by default.
E7Pro is also accompanied with plugins like Accu Weather, Alexa/Google Pagerank (shows Alexa Rank and Google Pagerank, comes from SearchStatus of FireFox) and Server Info.
Overall, it’s a must have addon for any Internet Explorer 7 users.
Download IE 7 Pro


